In December 2022, Microsoft began rolling out functionality to all tenants that allows users to delete 1:1 chats, group chats, and meeting chats they participate in.
It is important to note that this deletion only impacts the chat view of the user doing the delete action. Other users in the chat are not affected and do not lose the chat or chat history.
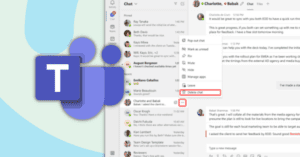
Once available, users will be able to delete chat threads or chat groups from the Teams desktop or mobile application. To do this, select the ellipsis and then the Delete option to clear the chat list. The key driver here is to allow users to clean up their Teams experience.
How to Delete Chats in Microsoft Teams Desktop

How to Delete Chats in Microsoft Teams Mobile App

Once your tenant receives this capability, it will be enabled by default. If you would like to disable this feature for your organization, you must do so in the Teams Admin Center (TAC) or through PowerShell.
In TAC, this setting can be found under messaging policies > Delete Chat.

To accomplish this with PowerShell, you must use the AllowUserDeleteChat parameter. For example:
Set-CsTeamsMessagingPolicy -Identity StudentMessagingPolicy -AllowUserDeleteChat $false
-AllowUserDeleteChat
Turn this setting on to allow users to permanently delete their 1:1, group chat, and meeting chat as participants. Set this to TRUE to allow. Set this to FALSE to prohibit.
Type: | Boolean |
Position: | Named |
Default value: | TRUE |
Accept pipeline input: | False |
Accept wildcard characters: | False |
Additional information regarding using PowerShell to block this functionality can be found here: Set-CsTeamsMessagingPolicy (SkypeForBusiness) | Microsoft Learn
Looking for assistance with Microsoft Teams?
Summary
In November, Microsoft began rolling out three new Sharepoint site templates targeted for HR (Human Resources), Events, and Contract Management. A Sharepoint site template is comprised of pre-populated content and layouts that allow site admins to build or refresh an existing SharePoint site in minutes. Learn more about these templates with this blog.
New SharePoint Site Templates
In November, Microsoft began rolling out three (3) new SharePoint site templates targeted for HR (Human Resources), Events, and Contract Management. Site templates are comprised of pre-populated content and layouts that allow site admins to build or refresh an existing SharePoint site in minutes.
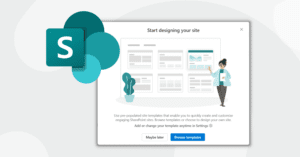
They can provide significant value to organizations by allowing new sites to be created with predefined designs that can include features and content. Once you create a new site, the first time you go to the site, you will be asked if you want to start designing your site.

If you choose to browse the templates, you will be able to find both ones that Microsoft has created, including these three new templates, and ones that your organization has developed, you can read about how to create your own SharePoint site templates here.

If you do not assign a site template immediately, you can always apply one later by going to the Settings icon and then selecting Apply a site template.

Once you have applied a template, your site will now look like the template and will have new lists and libraries as well.
Human Resources Site Template
There are three new site templates that Microsoft is deploying to every tenant’s site templates catalog. The first is a new HR template. The new HR site template brings together all the information your employees need to navigate employment and benefits.

The layout of the HR Communication site provides a Hero web part, Spotlights, and Quick Links with a right-side section where FAQs (frequently asked questions) can be displayed. There are additional pages pre-created for you to highlight topics such as Compensation and Benefits. The site can be simply configured using the content provided, but most likely it will be used as a jumping-off point for an HR site.
Event Site Template
The new Event template includes many great layout suggestions that will highlight any upcoming event you are planning. The idea behind this site is that you can provide a location that details everything about that event as it approaches. The countdown web part will display a timer that provides a link to register for the event (for example, you could provide a link to a Teams Webinar). It also provides web parts for Twitter and Yammer content about the event. As with all of these templates, you can add content to the template, or use it as a starting point for a more customized approach.

Contracts Management Template
The last template is designed to work with Microsoft Syntex, so you need to have some licenses for it to be displayed in the list of available templates.

With the contracts management template, you can learn more about how Syntex works and be able to get started right away. This template also comes with a prebuilt tutorial and some established models designed to help your team get started with Microsoft Syntex.

With the safety net of being able to revert a site to a previously applied SharePoint site template, site admins can now feel more empowered to give one of these new templates a test run on existing sites.
What do you have to do (admin/end user)?
This feature will be on by default with no admin control.
How this will affect your organization:
No explicit user action is needed to enable or use this feature.
What you need to do to prepare:
You may update your user documentation to inform users about this change.
Learn how to apply and customize SharePoint site templates.
Summary
The Whiteboard app will run on either iOS or Android and on multiple form factors. You have access to all the same Whiteboards that are available to you on your computer when you log in using your M365 account. All the features that were present in the desktop and web versions of the software are still there.
Microsoft’s Mobile Whiteboard App
In a recent article, I talked about some of the cool features of Microsoft Whiteboard, but I also wanted to ensure that I point out that Microsoft has delivered a mobile version of Whiteboard in addition to the web-based and desktop versions of the software. So, let us break down the mobile app and see what is available to us.
First off, the Whiteboard app will run on either iOS or Android and on multiple form factors. I am using a Samsung Galaxy Fold 4 and can use it equally on the small side screen, or the larger folding screen and with my finger or with the S-Pen on the folding screen. You have access to all the same Whiteboards that are available to you on your computer when you log in using your M365 account.

The list of things that you can do in the Whiteboard is at the bottom (at least in the tablet layout), but all the features that were present in the desktop and web versions are still there. For example, you can create a note and select its color.

The interface is a bit different because of the smaller form factor. Once you have it finished, you click on the “check”, and it is added to the canvas.

Note that I can also add reactions to the note, and it still displays who entered the note. We can still write on the canvas using various customizable pens that allow you to control the size and color. You don’t have as many displayed as presets, but that is chiefly due to limited-screen real estate.

I was able to easily use my fingers, but also the S-Pen on my phone. Figures can be added with an array of predefined shapes available that you can set the color of and enter text into. And text can be added as well in assorted colors if that is easier than reading someone’s handwriting.

You can add images either from your gallery or from your camera directly.

You can see that I can still add reactions directly to the canvas. You can still access the full array of templates that are available on the desktop and web versions. I will admit that it is harder to see and you will end up pinching and scrolling when using a large canvas or template, but the fidelity to the desktop version is impressive.

Next, you can still embed documents onto the canvas. This works for PowerPoint and PDF (Portable Document Files) files where you open the file (either on your device or in a cloud location) and then select the slides or pages that you want to be dropped onto the canvas to be viewed by all and then marked up.


So, whether you are at your desk, or on the go, you can still fully participate in Microsoft Whiteboard sessions and collaborate with your co-workers in a rich environment that will enhance your productivity. Take the Whiteboard App for Android or iOS out for a test drive today and be ready to work on the go.
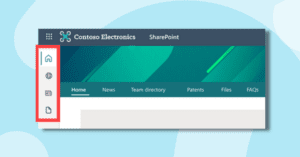
Microsoft introduced the SharePoint app bar early in 2021. This allowed for quick access to important content, global navigation, and content relevant to users such as a news feed and recent files.

The SharePoint app bar cannot be disabled permanently. However, it can be suppressed with PowerShell until March 31, 2023. The extension of this window is to allow organizations to complete their planning and change management process to prepare for this new functionality
What do you have to do (admin)?
If you would like to temporarily disable the SharePoint app bar follow these steps.
- Download the latest version of SharePoint Online PowerShell.
- Connect to your tenant (see Connect-SPOService (Microsoft.Online.SharePoint.PowerShell) | Microsoft Learn)
- Then, run the following command with administrator privileges:
Set-SPOTemporarilyDisableAppBar $true
To enable the SharePoint app bar that was previously disabled, run the following command in PowerShell:
Set-SPOTemporarilyDisableAppBar $false
When will this happen?
Temporarily hide SharePoint app bar available until March 31, 2023
Reference: Message Center Announcement
If there is one thing I miss from when we were all in the office together, it is the meetings in rooms with whiteboards. There is something soothing and calming about being able to get up to the wall and pour ideas on that empty white surface. You can erase it if it is wrong, and everyone can get up and add their thoughts and ideas to the group effort. Heck, it was cathartic to use the spray bottle to clean the board so that you could plaster it with new innovative ideas. Alas, those days of getting a group in a room with one or more whiteboards and the smell of dry-erase markers may never come again. But what if there was a way for us to still be able to share those ideas with our working group in a free-form manner? Microsoft Digital Whiteboard to the rescue.
If you have not used Microsoft’s digital whiteboard app, then I highly recommend that you give it a whirl. You can find the web version by clicking on the “Waffle” (App Launcher). If you do not see it immediately click on All Apps and it should show up. If not, contact your tenant administrator.

It works best on devices that have a touch screen or can accept a digital pen such as the Microsoft Surface Line, but you can also type text onto the Whiteboard as well. You can also use the Desktop version of Whiteboard (get it in the Microsoft Store). Admins, you can use Intune or Microsoft Configuration Manager to install Whiteboard automatically to all or groups of your users. See this link for more details.
At its base, Microsoft Whiteboard allows you to mark up a workspace with free handwriting using several different pens. You can erase and move your items around (that is something that you could not do with a physical whiteboard).

New Features in Microsoft’s Digital Whiteboard
Notes
Now you can add sticky notes or grids of stickies for use in brainstorming activities. Any user can type on one of the twelve assorted colored notes, and they are easy to move around. Notes are tied back to who wrote them, and users can add “reactions” to these notes.

Text Blocks
Technically, this feature has already existed. But it is now easy to type directly on the canvas. You have limited control over the text, like a Rich Text widget.

Shapes
If you want to add standard shapes like circles, triangles, diamonds, rectangles or arrows, this digital whiteboard will allow it. The shapes can also have unique colors and text.

Reactions
These allow users to drop various reactions onto other objects on the whiteboard. This can certainly enhance the input from people using the board, but you could also use this to track votes for ideas in a structured session.

Images
Microsoft Whiteboard also allows images to be dropped onto the surface even when it was still part of Lync meetings. You can mark up these images using the other tools in Whiteboard as before. One new feature is that Bing Image search is now built-in. You can pick an image from the internet using search.

Templates
One of the coolest new features in Microsoft Whiteboard is the Template feature. This provides a set of pre-built whiteboards that are set up for various tasks such as brainstorming, design, project planning, learning, and more.
While we are not yet able to load our own organizational templates into the system, Microsoft is always working to create new templates and hopefully will add this feature soon.

Documents
Here we can take certain types of documents and embed them into the whiteboard. You can insert pages of a PPT file as images that you can then mark up, or you can insert pages from PDFs (portable document files) in the same manner.

Links
Simply provide a URL and Whiteboard will give you a preview of the page and you can use all the other features with it. It is not live but does have an active link that you can click to get there. This is a terrific way to provide links to references or articles that you used as part of the design or brainstorming process.

Videos
To add a video to your digital whiteboard, you provide the web URL of a video from either Stream or some other location like YouTube or SlideShare. In this case, the link will be live so that you can watch the video on the whiteboard while you work.

I hope this introduction to Microsoft’s digital whiteboard app will open new ways to collaborate with others inside your organization. Happy Whiteboarding!
By default, Microsoft 365 (M365) tenants are configured to allow all users to create Microsoft 365 Groups. This means that each user can, in theory, create over 200 groups. These groups could be Microsoft Teams Workspaces, Exchange Groups, SharePoint Team Sites, Planner Plans, Power BI Workspaces, etc.
Microsoft 365 Groups are the building blocks of most of the features and applications that run in and on Microsoft 365. Because they are so important, they require special attention when you are planning for your implementation and ongoing governance of your M365 tenant.

Some organizations are worried that allowing users to create groups will create Team/Group/Site sprawl as users create multiple groups without any planning, and IT will be left to manage a plethora of artifacts, many of which they have no idea if they are in use, or even valuable. The easy solution is simply to turn off Microsoft 365 Group creation for all users, but this has some significant drawbacks as it prevents users from being able to use various apps and features in M365.
Organizations should approach the governance of M365 Groups holistically to maximize the productivity of the end users while maintaining security, compliance, and control over the groups created. To effectively do this, we break the lifecycle of M365 Groups down into five distinct phases.
1. Ideation

The first phase of Microsoft 365 Group creation is the Ideation phase. This is when a user first has the idea that they might want to create an M365 Group to perform some task or function. The user needs to be able to quickly and easily discover if a group that already serves their purpose exists so that they do not duplicate groups. They also should be guided to select the correct tool for their task. For example, if they need to store files and communication about a set of tasks, then a Microsoft Teams Workspace might be appropriate, but if they are tracking tasks and assigning them to users, Planner might be the more correct tool.
>Read my full blog on the Ideation stage of the Microsoft 365 Group Lifecycle.
2. Request

The request phase is when a user asks for an M365 Group to be created to complete their work. There are multiple ways for this to happen. They might be able to create a group themselves, or they might put in a request to the help desk using an existing system. There are many additional ways to capture that user request, but a well-developed system will prompt the user for everything that will be used in the decision-making process to create the site for them. This may include an approval process before the request is granted.
3. Creation

Creation is when the Microsoft 365 Group is built out. This may be a completely manual process, or it might be automated entirely or in part. Regardless of who creates the site, this is where the template design is applied and where owners and members are added. This is the optimal time to enforce things like naming conventions and choosing the managed path (sites/teams). This implies that you have decided on things like naming conventions, managed paths, and built-out templates beforehand. While vanilla groups can be customized by the end users, if we have pre-defined templates, it will save them time having to hand customize their new working area.
4. Monitoring

Once users are working on their new site, we move into the monitoring phase of the group’s lifecycle. We need to monitor the group to ensure that it is still in use. This could be easier if we asked the users how they would need the site as part of the request process. We should monitor all our sites for actual activity. Do not just rely on the last modified date, or if communications are in the group because this can be fooled by connectors that automatically post to the group or team, or jobs that upload files automatically to a SharePoint site even if no one is looking at them.
In addition, it is recommended that regular security audits be performed on the groups to ensure that only those people who need access to the group have access. Users, even external users, are often added to groups, but no one ever removes them later.
5. Archival

The last phase of a group’s lifecycle is the archival phase. Once a group is no longer in use, we need to gracefully archive it. Just because no one is using the group does not mean that the information (files, communications, etc.) is not still valuable to the organization. We should adopt a process to archive sites that has multiple steps and ensures that we do not lose critical or valuable information. When we design our templates, we should have an idea of what information we will want to save when the work is completed. For example, a project may want to save things like the Project Charter, the Design Documents, and As-Built Documents, but status reports might be okay to delete. We are going to need to know where this content will be stored and ensure that retention labels are used to automate the removal of that content when it is no longer needed.
How Do You Get Started
Getting started on this journey may seem daunting, but not setting up controls around your Microsoft 365 Group lifecycle will just make getting it under control more difficult in the future. Step One is to take each stage of the lifecycle and document how you do it today. Then, you can design how you want to handle these issues in the future and if you are going to automate the processes.
Looking for additional assistance with Microsoft 365?
Empowering employees via training has always been an important part of running a good business. However, we’ve seen new challenges in this space in recent years.
One of the major challenges that have emerged is that many employees now work outside of the office in a hybrid or remote system. In the pre-pandemic world, training was often handled in person where we would schedule a time for employees to sit in a room with trainers who would lead them through updates on critical applications and how to use them correctly.
With remote and hybrid work, however, this has turned into video training sessions where, for example, we invite users into a Teams meeting, and the trainer leads them via a screen share. We record the sessions and make them available to users afterward in case someone missed the training session or needs to refresh themselves.
Our experience over the past couple of years has shown us that training effectiveness has gone down while our expectations of employee skills have increased. Enter Viva Learning.

Viva Learning is not going to replace your current LMS (Learning Management System), but it can make it easier to empower your employees to find relevant training and gain access to it. It is embedded into Microsoft Teams and allows users to search a training catalog comprised of Microsoft Learn, Microsoft 365 Training, and a selection of LinkedIn Learning courses (the top 125 most popular). Your employees can search for key training terms and find courses related to that topic.

They can then save those courses to take later, and they can share courses that they have found with other employees in your organization. This makes it easy for employees to share training with each other.

Extending Your Learning Investment
When you use Viva Learning in your organization, you extend the reach of your current training by making it easily searchable and easy to find and share. Viva Learning already interfaces with an ever-growing list of LMS services, and you can even use SharePoint as a service to host internally developed training or work with a partner like Quisitive to create an interface to your system.

How Do I Get Viva Learning?
The good news is that if you already own Microsoft 365, then you have access to Viva Learning today. You will be able to add the application to Microsoft Teams and then your employees will be able to access Microsoft Learning, Microsoft 365 Training, and the top 125 LinkedIn Learning courses. They can share and create Learning Tabs in Microsoft Teams to provide contextual learning to a specific Teams Workspace.

But Wait, For the Low, Low Price of… Free
The base level of Viva Learning is useful, and it is included in your Microsoft 365 licenses. Viva Learning starts to shine when you upgrade to the premium version. When you do, you can connect your LMS to Viva Learning and employees can search the catalog of courses available to them in that and other providers. You can also recommend courses to users and when they complete them in Viva Learning, the system will report the completion back to your LMS. Lastly, you will be able to have learning content surface in searches from Bing.com, Office, and SharePoint.
You can purchase Viva Learning by itself for $4/user per month, or as part of the Viva Suite (which includes Viva Connections, Viva Engage, Viva Goals, Viva Insights, and Viva Topics for a combined price of $9/user per month. You can find out the latest on Viva Learning including the latest prices by going to Microsoft’s Viva Learning site.
Looking for additional assistance with Microsoft Viva?
Microsoft has been talking about the end of support for Internet Explorer in their Web apps and services since December 2020. Next month they will be taking another big step in this process.
Internet Explorer 11 Hard Blocked by SharePoint Online and OneDrive
Beginning mid-January, 2023, access to SharePoint Online and OneDrive from Internet Explorer 11 and Edge IE will be hard blocked for all users. Users should access these services through a modern browser, and we recommend a modern browser such as Microsoft Edge or Google Chrome as a faster, more innovative browser than IE11.
The current user experience when accessing SharePoint Online or OneDrive from IE 11 allows the user to ignore the message and continue browsing.
The current soft block experience looks like this:

After the hard block is deployed, the user will not have the option of continuing to SharePoint Online or OneDrive.
The future hard block experience will look like this:

What do you have to do as an admin or end user?
If you still use IE11 to access SharePoint or OneDrive content, we strongly recommend you review the following guidelines to help avoid service disruption for users:
The Quisitive team is happy to assist your organization in implementing these guidelines. To get in touch with an expert today, please reach out via our Contact Us page.
When will the Internet Explorer 11 Hard Block happen?
Internet Explorer 11 will be hard blocked, and you will be required to upgrade your browser starting in mid-January 2023.
Additional References:
- Message Center Announcement
- Microsoft apps and services to end support for Internet Explorer 11 – Microsoft Lifecycle | Microsoft Learn
;)
This blog offers guidance on Microsoft 365 migrations, including the differences between key Microsoft 365 apps (OneDrive, SharePoint and Teams).
The purpose of this blog is to offer guidance on Microsoft 365 migrations, including the differences between key Microsoft 365 apps (OneDrive vs SharePoint vs Teams) and where to map content based on purpose, audience, and the tools needed to support that content.
Microsoft 365 Migration Planning
Before you start your Microsoft 365 migration, specifically your content migration, you must plan the outcome by assessing your current source environment. What you discover will influence your overall strategy and timing, including:
- The design of the target environment and the mapping between source and target systems.
- The amount of content you migrate. Determine if the content is redundant, out of date, or still relevant.
- The building of the user onboarding into your upfront planning. Communicate early and often with your users about the migration and how it will impact them. Don’t wait until the very end to start preparing them for the change.
Microsoft 365 Migration: OneDrive vs SharePoint vs Teams
When to use OneDrive
OneDrive is meant to be used to store files that are personal to you. Each person in your organization gets their own OneDrive, which includes at least 1TB of space.
The recommendation is that if you’re working on a file by yourself, save it to OneDrive. For example, use OneDrive vs SharePoint when working with personal files that shouldn’t be shared, or drafts of files that are not ready to be moved to a SharePoint library or Teams for collaboration.
While users will be able to share documents from their OneDrive site, they should not use OneDrive to store documents that should instead be stored on a SharePoint site. The following guidelines should be communicated to users regarding when to store something in OneDrive:
1. Documents that you personally need to do your job, but that would not benefit others. For example, documents like task planning spreadsheets that you use to organize your work.
2. Documents that you need to share with a few limited individuals for a limited amount of time. For example, you and a few others are planning a team celebration, and you post a pdf of the menu from a restaurant that the team is considering.
3. First draft documents that you are working on that you are not quite ready to share with others. However, if this document needs to be shared with a wider audience or needs to live on for a long period, it should be stored on a SharePoint site.

When to use SharePoint
A SharePoint site is a container of information and data. Information can be stored in repositories such as lists, libraries, calendars, etc. When considering SharePoint as a destination for your files, it is important to first distinguish between the two types of modern SharePoint sites available and when is the best scenario to use them.
- Communication Sites – The primary goal of this type of site is to inform readers – mainly for them to read, not create. A typical use of a communication site is an Intranet. Used to broadcast information to a broad audience, in this type of site, only a small set of members contribute content that is consumed by a much larger audience.
- Share content such as news, official documents, and reports that you want to share visually in a compelling format, an example is a human resources site with benefits information.
- Inform and engage dozens or hundreds of readers (or the entire organization).
- Showcase the services your group offers or tell a story about a new product launch to the entire organization.
- Team sites – Used primarily for collaboration among members of your team or with others on a specific project, team sites allow most members to contribute content to the site, and the information is limited to only the members of the team or project stakeholders. This type of site may or may not be connected to a Microsoft 365 group. Use this type of site when:
- Content is meant to be shared with a small audience for specific goals and tasks that need to be accomplished.
- Track and stay updated on project status.
- Organize and co-author shared content.
- Optionally connect to a Microsoft 365 group to access team resources (e.g., Microsoft Teams).

When to use Teams
When thinking about the differences between SharePoint vs Teams, it’s important to note that a Microsoft Teams workspace is a SharePoint Team site (see the previous section) that is connected to a Microsoft 365 group. It is a collection of people, conversations, files, and tools all in one place. It extends the capabilities of a regular SharePoint Team site by offering chat options, real-time collaboration and communication, and meeting, file, and app sharing.
Use a Microsoft Teams workspace when you want to:
- Pull together a team.
- Communicate by using chat instead of email.
- Take advantage of rich chat with text, audio, video, and file sharing.
- Securely edit files at the same time.
- Provide transparency to the team by posting messages and starting threads.
- Have a private chat to develop an idea, then share it with the rest of the organization.
- Store all files related to a topic in one place.
- Integrate your favorite apps, such as Planner, Trello, OneNote, etc.
Looking for further guidance?
Now that you understand the key differences between OneDrive vs SharePoint vs Teams, we hope you feel better prepared to utilize these apps effectively. If your organization is beginning its Microsoft 365 migration journey and you’re looking for expert guidance, Quisitive can help.
Explore our Microsoft 365 Services
Updates to Microsoft Viva Engage
Inside Microsoft Viva Engage, Microsoft has made available Storyline in Public Preview. See the announcement here.
Storyline is a new way for people to share, connect, and contribute to their organization through Yammer and the Microsoft Viva Engage app. Previously, the only way to share broadly through Yammer was through communities, but communities aren’t always a perfect fit for what people want to share. In some cases, there may not be a community that matches the subject the person wants to discuss. In other cases, the community’s audience may be too broad, or not broad enough. Enter Storyline…
Storyline posts are posts to your followers and other interested people from within your organization. People interested in knowing what you have shared can go to your profile page in Yammer to view your storyline feed. Once there, they can choose to follow you and select through which clients, Teams and/or email, they want to be notified of new storyline posts. Because only people who follow you, and those who you @mention, will be notified when you make a new storyline post, you don’t need to worry about spamming people who aren’t interested in what you are sharing.
Updates to Microsoft Viva Topics in Teams
Microsoft has updated the rollout timeline for Viva Topics in Teams.
Viva Topics in Teams allows users to mention topics in their chat conversations so that others in the conversation can easily learn more about a topic by hovering over the topic name and viewing the topic card. This feature requires users to have a Viva Topics license.
This message is associated with Microsoft 365 Roadmap ID 72189
When this will happen:
- Public Preview: We began rolling out in April and will continue rolling out through June and expect a complete rollout by late June.
- General Availability: We will continue rolling out through late June and expect a complete rollout by mid-October (previously late July).
- GCC: We will continue rolling out in early July and expect a complete rollout by late October (previously late August).
How this will affect your organization:
If your organization has users with Viva Topics licenses, those users will be able to mention topics by typing the # character and choosing a topic from the topic picker. The topic picker will narrow selections based on what the user types. Once a topic is selected, users can post the message.
What you need to do to prepare:
There is nothing you need to do to prepare for this change. The topics being displayed will be the same topics that are shown in Outlook Web and SharePoint.