;)

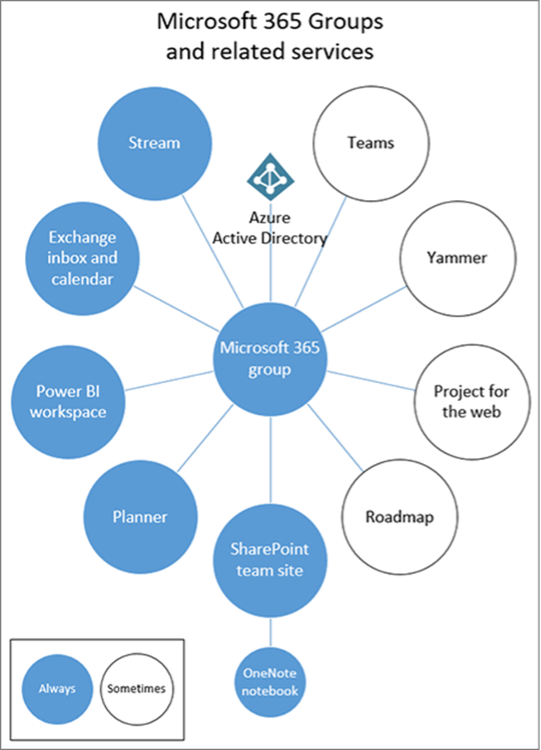
By default, Microsoft 365 (M365) tenants are configured to allow all users to create Microsoft 365 Groups. This means that each user can, in theory, create over 200 groups. These groups could be Microsoft Teams Workspaces, Exchange Groups, SharePoint Team Sites, Planner Plans, Power BI Workspaces, etc.
Microsoft 365 Groups are the building blocks of most of the features and applications that run in and on Microsoft 365. Because they are so important, they require special attention when you are planning for your implementation and ongoing governance of your M365 tenant.
Some organizations are worried that allowing users to create groups will create Team/Group/Site sprawl as users create multiple groups without any planning, and IT will be left to manage a plethora of artifacts, many of which they have no idea if they are in use, or even valuable. The easy solution is simply to turn off Microsoft 365 Group creation for all users, but this has some significant drawbacks as it prevents users from being able to use various apps and features in M365.
Organizations should approach the governance of M365 Groups holistically to maximize the productivity of the end users while maintaining security, compliance, and control over the groups created. To effectively do this, we break the lifecycle of M365 Groups down into five distinct phases.
1. Ideation

The first phase of Microsoft 365 Group creation is the Ideation phase. This is when a user first has the idea that they might want to create an M365 Group to perform some task or function. The user needs to be able to quickly and easily discover if a group that already serves their purpose exists so that they do not duplicate groups. They also should be guided to select the correct tool for their task. For example, if they need to store files and communication about a set of tasks, then a Microsoft Teams Workspace might be appropriate, but if they are tracking tasks and assigning them to users, Planner might be the more correct tool.
>Read my full blog on the Ideation stage of the Microsoft 365 Group Lifecycle.
2. Request

The request phase is when a user asks for an M365 Group to be created to complete their work. There are multiple ways for this to happen. They might be able to create a group themselves, or they might put in a request to the help desk using an existing system. There are many additional ways to capture that user request, but a well-developed system will prompt the user for everything that will be used in the decision-making process to create the site for them. This may include an approval process before the request is granted.
3. Creation
Creation is when the Microsoft 365 Group is built out. This may be a completely manual process, or it might be automated entirely or in part. Regardless of who creates the site, this is where the template design is applied and where owners and members are added. This is the optimal time to enforce things like naming conventions and choosing the managed path (sites/teams). This implies that you have decided on things like naming conventions, managed paths, and built-out templates beforehand. While vanilla groups can be customized by the end users, if we have pre-defined templates, it will save them time having to hand customize their new working area.
4. Monitoring

Once users are working on their new site, we move into the monitoring phase of the group’s lifecycle. We need to monitor the group to ensure that it is still in use. This could be easier if we asked the users how they would need the site as part of the request process. We should monitor all our sites for actual activity. Do not just rely on the last modified date, or if communications are in the group because this can be fooled by connectors that automatically post to the group or team, or jobs that upload files automatically to a SharePoint site even if no one is looking at them.
In addition, it is recommended that regular security audits be performed on the groups to ensure that only those people who need access to the group have access. Users, even external users, are often added to groups, but no one ever removes them later.
5. Archival

The last phase of a group’s lifecycle is the archival phase. Once a group is no longer in use, we need to gracefully archive it. Just because no one is using the group does not mean that the information (files, communications, etc.) is not still valuable to the organization. We should adopt a process to archive sites that has multiple steps and ensures that we do not lose critical or valuable information. When we design our templates, we should have an idea of what information we will want to save when the work is completed. For example, a project may want to save things like the Project Charter, the Design Documents, and As-Built Documents, but status reports might be okay to delete. We are going to need to know where this content will be stored and ensure that retention labels are used to automate the removal of that content when it is no longer needed.
How Do You Get Started
Getting started on this journey may seem daunting, but not setting up controls around your Microsoft 365 Group lifecycle will just make getting it under control more difficult in the future. Step One is to take each stage of the lifecycle and document how you do it today. Then, you can design how you want to handle these issues in the future and if you are going to automate the processes.