
Answer the question, “What is Power Automate?” and learn how to use Power Automate Flows with this beginner’s guide!
In this blog, I’ll cover:
- What is Power Automate?
- Setting Up Power Automate
- Power Automate Licensing
- How to Build Power Automate Flows
- Common Power Automate Use Cases
What is Power Automate?
Microsoft Power Automate is a part of Microsoft’s Power Platform. It’s a cloud-based tool designed to simplify workflows and business processes through automation. It transforms repetitive tasks into automated processes, freeing up your time for more meaningful work.
Power Automate Flows are the automated sequences of actions, triggered by specific conditions set by the user. What makes Power Automate stand out is the wide variety of connectors and templates it offers:
- Connectors: Power Automate supports over 500 integrations, including Microsoft apps like Outlook, SharePoint, and Teams, as well as third-party tools like Gmail, Slack, and Dropbox. These connectors link various platforms, enabling smooth interactions between applications.

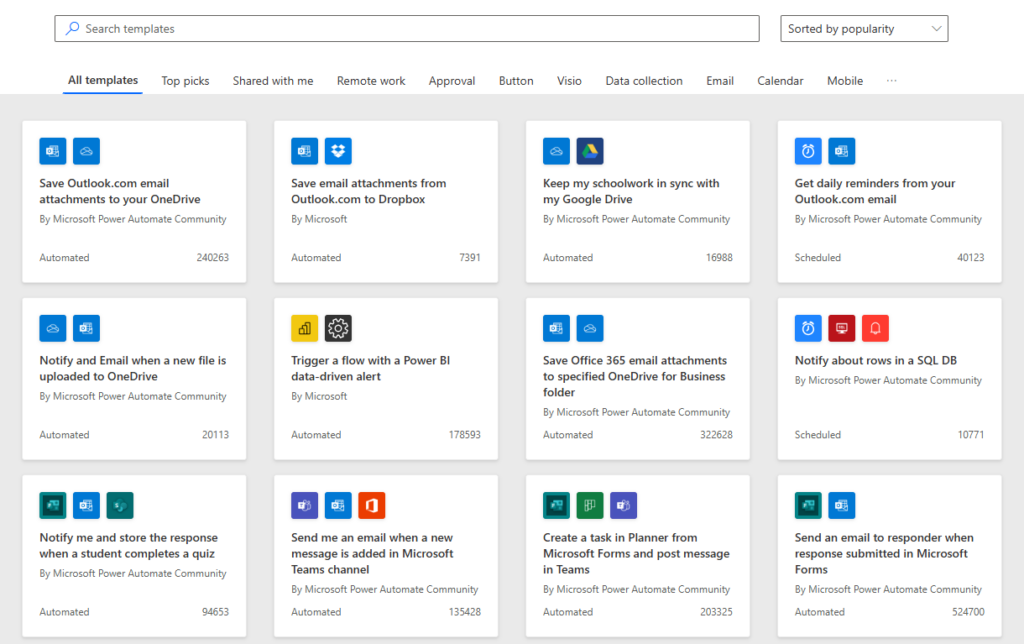
- Templates: Power Automate provides pre-built templates for common tasks, such as syncing files, automating email responses, or sending notifications after a form is submitted.
By combining these features, Power Automate offers unparalleled versatility. You can create anything from simple workflows to complex multi-step processes—all tailored to your needs.
Who Can Use Power Automate?
One of Power Automate’s strengths is that it is a low-code/no-code solution, meaning you don’t need to be a professional developer to use it. While IT professionals can create intricate flows with advanced configurations, its drag-and-drop interface and templates mean anyone can build an effective automation.
Power Automate is truly a tool built for everyone. Whether you’re a small business or a large organization, Power Automate has something for you.
- For Small Businesses: Smaller teams often juggle multiple responsibilities, leaving little time for administrative tasks. With Power Automate, you can automate invoice approvals, customer follow-ups, or social media updates—reducing manual work and increasing productivity.
- For Enterprises: Larger organizations face the challenge of running effective processes across different teams and systems. Here, Power Automate shines with its ability to integrate complex workflows and scale to fit unique needs.
Setting Up Power Automate
Before you can create your first automated workflow in Power Automate, you’ll need to set up your account, familiarize yourself with the interface, and choose the plan that suits your needs.
How to Access Power Automate
To access Power Automate, you’ll need a Microsoft account either through a company license or as an individual.
You can access Power Automate either via your web browser at Power Automate or through the Microsoft 365 dashboard. Just click on the Power Automate icon, and the platform will open up.
Navigating the Power Automate Interface

When you first open Power Automate, the interface might feel like entering a new workspace, but don’t worry—it’s easier to navigate than it looks. Here’s a quick breakdown of its key sections:
- Dashboard: This is your starting point. It displays essential information like recent flows, suggested templates, and shortcuts to create new workflows.
- Templates: Think of templates as pre-built workflows. Whether you’re setting up email notifications or syncing documents, these templates act as your creative springboard.
- Create Tab: In this section, you can build flows from scratch or select from pre-designed templates. It’s ideal for both beginners and advanced users who want more customization options.
- Action Triggers and Connections: Explore available apps and services that Power Automate can connect to. On this page, you’ll find triggers (actions that start a flow) and actions (steps the flow performs).
Power Automate Licensing: Choosing the Right Plan
Power Automate offers both free and paid options, so picking a plan depends entirely on your goals. Here’s a quick overview of Power Automate Licensing to help you make the right choice:
- Free Tier: This plan is perfect for individuals or personal projects. It has limited functionality, offering access to standard connectors and basic flows. If you’re just experimenting or automating small tasks, the free option is a good start.
- Premium Plans: Designed for professionals and businesses, these plans include premium connectors (e.g., Salesforce, Adobe, etc.) and unlimited workflows. Pricing typically varies depending on the number of flows and users you need to support.
- Microsoft 365 Users: If you already have a Microsoft 365 subscription, some Power Automate features might be included at no extra cost. Be sure to check your license details for available benefits.
By selecting a Power Automate Licensing plan that aligns with your needs, you’ll avoid unnecessary costs while unlocking the features that matter most to you.
How to Build Power Automate Flows
Creating your first flow in Power Automate may seem daunting, but it’s actually quite simple. With the right guidance, you can quickly turn an idea into an automated process that saves time.
Here are some essential tips to help you begin, keep your workflow intuitive, and avoid common mistakes.
Selecting a Template vs. Starting from Scratch
When building a flow, you’ll first need to decide whether to use a pre-built template or start from scratch. Each option has its own benefits based on your needs, expertise, and task complexity.
Templates
Templates serve as ready-made workflows where much of the heavy lifting has already been done. For example, you can use a template to send email notifications when a file is uploaded to SharePoint or sync your calendar events to a spreadsheet. These templates:
- Offer pre-defined triggers and actions.
- Give you a blueprint that’s easy to customize.
- Help beginners avoid technical challenges.
Starting from Scratch
If your task is unique or requires specific conditions, starting from scratch offers the flexibility you need. Building from scratch is ideal for:
- Complex workflows that have multiple steps.
- Scenarios where templates don’t meet your requirements.
Both templates and starting from scratch are valid approaches. Use a template for quick solutions, and start fresh for more control and customization.
Adding Triggers and Actions
At the heart of Power Automate are triggers and actions. Think of a trigger as the starting point—the event that sets your flow in motion. Actions, on the other hand, define what happens next. Let’s break this down further.
Power Automate Triggers answer the question: What’s going to start my workflow? For instance:
- Receiving an email in your inbox.
- A new row being added to a spreadsheet.
- A button clicked in a mobile app.
Once the trigger happens, your flow springs into action.
Power Automate Actions are the steps that follow the trigger. For example:
- Sending an email response to a customer.
- Adding a row to a database.
- Sending a notification to your team.
Each flow will include at least one trigger and one action, but you can chain together multiple actions to create more advanced workflows.
The sequence of your actions is important to consider so that your flow delivers your desired outcome.
How to Test Your Power Automate Flow
After you’ve set up your flow, it’s crucial to test it to ensure everything works as needed. Testing early helps you identify and fix issues before your flow is fully implemented.
- Run Your Flow Power Automate allows you to test your flow right from the interface. Use sample data or trigger the workflow manually to see how it performs. Pay close attention to whether all the actions execute successfully.
- Check the Run History. Each time you run a flow, Power Automate generates a detailed log of what happened. The Run History section will show a breakdown of every step. If something doesn’t work, you’ll often see an error message here with specific details, like:
- Missing or misconfigured connections.
- Invalid input formats.
- Conditions not being met.
- Common Troubleshooting Tips Here are a few tips for resolving common issues:
- Double-check your trigger conditions. Is the trigger set up correctly to detect the initial event?
- Ensure your actions are in the right sequence and that you are using the correct data inputs.
- Review permissions for any connected apps or services—sometimes access can be restricted, leading to failures.
Exploring Common Power Automate Use Cases
Power Automate is a versatile tool that addresses various daily challenges, such as managing emails, tracking recurring tasks, and handling complex data management.
Here, we’ll explore common applications of Power Automate in workflows.
Automating Email Notifications
With Power Automate, you can set up automatic email alerts tailored to your needs. For example:
- Track Important Updates: Create a flow that notifies you when an email from a specific sender arrives. This ensures you never miss critical messages from your boss, clients, or team members.
- Simplify Task Assignments: Set up an automated email when someone assigns a task to you in Microsoft Planner or a project management app like Trello.
- Filter Noise: Reduce clutter by routing less important emails to a dedicated folder and notifying you only about high-priority ones.
These automations can be configured in a few clicks using pre-built connectors for Outlook, Gmail, or other email services.
Scheduling Routine Tasks
Do you find yourself repeating the same tasks weekly or even daily? Power Automate can handle these repetitive tasks without you lifting a finger. For instance:
- Recurring Reminders: Schedule reminders for regular activities like submitting reports, following up with leads, or attending meetings.
- Automated Data Updates: Create a flow to refresh data in a SharePoint list or update an Excel spreadsheet on a set schedule.
- Event Announcements: Send automated messages at a specified time to notify your team about an upcoming event or deadline.
Streamlining Data Management
Power Automate connects with apps like Excel, SharePoint, and even third-party platforms to unify and simplify your data workflows. Here are some common examples:
- Integrate Tools: Automatically sync data between Excel and SharePoint, ensuring your files stay up-to-date across platforms.
- Consolidate Information: Import data from third-party services like Google Sheets into your Microsoft ecosystem.
- Monitor Changes: Get alerts when a specific row or column in a spreadsheet is updated, allowing you to react quickly.
By connecting different platforms, Power Automate eliminates the need for manual data transfers and reduces the risk of errors. Think of it as the bridge that keeps all your tools working together seamlessly.
Tips for Optimizing Your Flows
Getting comfortable with Power Automate is just the beginning. You’ll want to fine-tune your flows for efficiency, clarity, and adaptability. By building smarter workflows, you’ll not only save time but also avoid common pitfalls.
Below are some actionable tips to help optimize and maintain your flows.
1. Using Conditions Effectively
One of Power Automate’s most powerful features is the ability to add conditional logic to your flows. Conditions allow your flow to branch out based on specific criteria.
Here’s how you can use conditions effectively:
- Define Clear If/Then Scenarios: For example, imagine automating approvals for an expense report. If the amount is under $500, the flow could auto-approve it. If it’s higher, it could route the task to a manager.
- Avoid Overcomplicating: It’s tempting to stack multiple conditions into a single flow, but this can make it hard to troubleshoot later. Instead, break complex logic into smaller, separate steps.
- Test Edge Cases: If your flow has conditions based on date ranges, user inputs, or specific values, think about “what if” scenarios. This will help you catch errors before they occur.
2. Managing Flow Runs
A flow run is essentially the number of times your flow is executed. Every time a flow runs, it consumes system resources, and if you’re on a limited Power Automate License, it also uses up your quota. Flow run management ensures you’re not pushing your flows or account limits unnecessarily.
Key tips for managing your flow runs:
- Monitor Usage: Use the Power Automate “Run History” to see how often your flows are triggered. This is especially useful if a flow gets stuck in a loop or is triggered too frequently.
- Use Delay Actions Mindfully: Delays in a flow can be helpful, but they also create longer runtimes. Avoid unnecessary pauses to keep things running smoothly.
- Granular Triggers: Instead of setting a trigger for “every email,” set it for “emails with specific subjects” or “emails from certain senders.” This avoids unnecessary activations.
Learning Through Community and Resources
Even if you become a Power Automate expert, there’s always more to learn. The good news? There are many resources at your disposal:
- Microsoft Power Automate Documentation: Explore Microsoft Learn to find documentation and news.
- Explore Tutorials: Check out YouTube videos and blogs posted by the community. You can find helpful guides and demos on my site or my YouTube channel.
- Join the Forums: Microsoft’s Power Automate Community Forum is packed with user questions and solutions.
Conclusion
Power Automate opens the door to endless opportunities for streamlining tasks and saving time. It empowers users of all skill levels to simplify routine processes, connect their favorite apps, and focus on what matters most.
Need professional support for Power Platform?
Quisitive’s Power Platform Managed Services Program gives you access to a team of Power Platform experts who manage your existing platform and provide guidance for continuous improvement.
Expand your team and tackle business objectives with the help of Quisitive’s Power Platform services.